Tuesday, September 4, 2012

More fun with recycled jeans!

This isn't a tutorial but just a fun picture of my latest project and the links to the two tutorials that I combined to make this fun project so that you can replicate! 


 This is where I got the idea for the ruffles and the liner:
This is where I got the idea for the basis of the bow:

Happy upcycling!

Monday, September 3, 2012

Zucchini Zucchini Zucchini!


This must be the year of the zucchini, because I have had them coming out of my ears! If you're in the same boat then this is the post for you. :) This is also the post for you if you're looking for a way to please crowds of hungry people with healthy delicious food! Never was I more delighted than when I whipped up this recipe and my kids not only ate them but devoured them and begged for more!(insert shock and awe) Vegetables. As breakfast food. Can it get better than that? 
INGREDIENTS: 
  • Zucchini 
  • eggs
  • cinnamon
  • vanilla extract
DIRECTIONS:

  • Shred your zucchini, skin and all
  • Heat a skillet to around 350 degrees Fahrenheit. (you just don't want to start them in a cold pan, so just the high setting on the stove works)
  • Whip two eggs along with a dash or two of cinnamon and a teaspoon of vanilla extract french toast batter style in a small bowl (minus the milk of course)

  • Add the shredded zucchini to the mixture and use a spoon or your hands to toss the shredded zucchini and get it thoroughly coated. It will be runny ooey gooey, and that's okay. The eggs in it will cause it to all stick together beautifully when cooked. 
  • Thoroughly grease the pan/skillet with your choice of butter or oil. You don't want these babies to stick, and they will if they're not greased up. 
  • Simply grab or spoon a nice ping pong ball size amount of battered zucchini onto your skillet and then flatten to round pancake thickness.
  • Listen to that delectable sizzle. :) check the cakes and flip them when they reach golden brown in color. If your first flap jack comes out crunchy lower your temp and cook longer. My favorite ones were very slightly aldente, but your crowd might not appreciate that like mine did. 
  • Enjoy! This recipe is friendly to doubling, tripling, adding different flavor extracts and any other artistic ambition, just post the different things you tried and how they turned out below in the comment section! 
p.s. Our favorite topping for this was home made blueberry syrup. Which is just two cups brown sugar to one cup water along with one cup fresh blueberries brought to a boil and then a squirt of maple extract added. Okay, so it's blueberry maple syrup but great on the zucchini cakes none the less. ;)
 
Happy Munching! 
  

Wednesday, August 29, 2012

Adventures in parenting- Episode #1567

Our adventure starts with baby number four, boy number three, nearly two year old Griffin starting to escape his crib. After three days of hoping he'd magically quit hopping out of the cage, we finally caved and moved the crib out and the toddler bed in. We were milking every day we could out of the captivity of the crib...funny how with your first child you can't wait for those milestones and then each child after that you draw out the inevitable as long as you can. With the first baby your facebook statuses read "Alex just rolled over!!! What a big strong man, can't wait for the next thing!" and "Johnny just took his first step! We'll be blazing trails in the park in no time!" The more seasoned mother's statuses look more like: "Well, Emma just rolled over. That means I only have two more months of peace before the little monster starts pulling the decorations down and eating everything I don't have time to vacuum."...guess which one I am? ;)
In preparation for this moment we had removed the wardrobe and installed a large cabinet up out of little hands reach to store his clothes, diapers, shoes, etc. (Can you tell we've done this before? How many times have some of you had to re-fold all the contents of a dresser or closet that little hands have found? Let me rephrase that. How many hundreds of times have you had to refold giant mounds of clean clothes?) We put safety plugs in all the outlets, took out anything we thought he could climb up onto and fall off of to hurt himself. The goal here was to make the room kind of like a safe house so that we could just lay him down in his bed and shut the door, allowing him to run around freely and make his own decision to go to sleep. Once again, we'd been here before, and tried many other avenues- Sitting out in the hallway outside of baby's doorway until drunk with exhaustion constantly hopping back off of my perch to reprimand for getting out of bed, for climbing up something, for playing with toys...ugg, no thank you! If there's one thing I've learned, it's that you can't make someone do something. Even if you work really hard to intimidate them into it. (Not that I've ever tried that...;) ) So instead I've grown to appreciate lending a false deaf ear to things. What is this you ask? A false deaf ear? Yes, it's where you can hear Billy and Johnny beating the ever living tar out of each other with the nerf bats, and you can hear Johnny (who had it coming by the way) screaming for mercy, but you smile at your house guests, recross your legs and ask Pam how Gracie is doing in ballet class. You can hear what is going on, but sometimes, you pretend you can't for sanity and mostly, for the child's sake. Children really don't need to be rescued all the time, and if you try, it's you who will need rescuing.
So, back from that bunny trail we have Griffin in his panic room, err, I mean, safe room. Or so we thought... On the first night I still wound up going into his room multiple times to put the toddler bed back in the corner since his room has two great big windows that dominate a whole wall,  wood floors that make sliding furniture around easy for little people, and it was a duh-ism to this tot to make a stool out of the bed and climb up into the window. Hey, I said I tried not to rescue children too often, not that I wanted to assist them in suicide! Also, he was continually taking the mattress off of the bed and then sobbing because he couldn't get it back on again. After a restless night we had to get more creative, and came up with this:
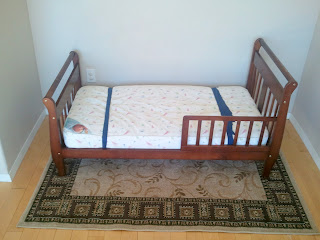
Two ties made from cut strips of an old sheet tying the mattress to the bed frame but staying soft and flush so that Griffin wouldn't be too uncomfortable and feel the strips under the sheet once we put it on. Then the whole shebang placed on an area rug that we put hot glue gun style no slip backing on. (If you don't know what that is, let me explain! Just warm up that hot glue gun you have stored away for crafts, and make a zigzag pattern all over the backing of the rug. Let it dry, and then wala! instant non slip rug without the fussy separate backing sheet that always comes out from under the rug to play ugly peek-a-boo.) Plus...we put a few dots of hot glue on the legs of the bed so that he really couldn't move that sucker. (let it dry a few minutes turned upside down and it works the same as the rug)
Mr. Griffin is now sleeping snug as a bug in his newly made safer safe room and this is one happy mama! How the heck else did you think I'd have time to write this blog post?!
I hope the sharing of these ideas will spread a little more sanity and parent quiet time to the world!
<3 MamaDonna

Wednesday, July 18, 2012

What a Watermelon!


Today I wanted to show you how easy it is to cut and arrange a watermelon for special occasions. :) I had no idea how hard I was making cutting watermelon up on myself until I tried this new technique: 
Cut the end caps off the melon, place on one of the flat ends on a cutting board, and then slice the rind off vertically. This method wastes the least watermelon, makes the melon easiest to handle, and then presents you with an opportunity to craft with it!
My watermelon after cutting with above technique and then cutting into rounds

leaves and flower center cut out
Fourth of July watermelon (this was before I learned the WAY easier way to cut the watermelon up)

more petals and leaves

 One of my favorite watermelon ideas (off Pinterest of course!) was to cut the melon into rounds like in the above pic, and then use cookie cutters on it to cut pieces. This is a fun way to make it special for any occasion. As you can see the possibilities are limitless. For my fun little flower tray all I did was use a Christmas holly leaf cookie cutter for the leaves, I had an oval scalloped wreath looking cookie cutter that I bent to be tear shaped for the petals, and then I used a biscuit cutter for the centers!  Arrange aesthetically to your fancy.  Also, to add a little more detail and some whimsy I used a wooden shishkabob skewer  to carve spirals in the flower center, and details into the petals and leaves. Wala!
  Short tutorial, I know, but it's pretty darn simple, so to go on further would be rambling! Happy cutting! ....okay that sounded a little sadistic, so, happy watermelon cutting! :) 

Oh! One last thing- here is a great link to how to pick an amazing watermelon too. :  http://fifteenspatulas.com/2011/04/25/how-to-pick-a-superstar-watermelon/


Tuesday, July 17, 2012

Why did I EVER buy yogurt from the store?!


Making your own yogurt is the easiest thing you'll ever do, and after you've made it, you'll never want to buy it from the store again! 

Ingredients &  Supplies

  • Large pan or dutch oven (I use my 6 quart stainless steel pan and it works great)
  • Food/Beer thermometer that goes as low as 120 degrees Fahrenheit, and up to at least 185 degrees Fahrenheit
  • A gallon of milk- 2% works well, but you can use any grade you'd like
  • At least 2 TBS of store bought yogurt, or if you choose you could also buy plain yogurt culture from a specialty store. I just found it easier to pick up a 50 cent container of Chobani Greek yogurt, and use that.The higher the culture count and the more different types of cultures the better.
  • A cooler- see directions below if you don't have a cooler *
  • Air tight containers to put the yogurt in- I used mason jars w/lids & rings the first batch, and large sour cream containers the second batch, both worked just fine. The most important thing is that it will keep the yogurt water tight when it's in the cooler. I had one jar whose lid was a little loose and it was an ugly sight the next morning when I opened that particular jar. (Think sippy cup of milk left in the sun)
Directions

  1. Pour your whole gallon of milk into the pan and heat slowly to 185 degrees Fahrenheit checking frequently with the thermometer so as not to over heat and definitely do not allow to boil. 
  2. As soon as milk has reached the proper temp remove the pan off the stove and put in a cool bath- I filled my sink with cold tap water and added ice cubes to it, and that worked great.   
  3. Again with the thermometer,  monitor the milk temperature until the temp drops to 120 degrees Fahrenheit. 
  4. Take a small bowl full of the 120 degree milk and add your 2 TBS yogurt to it (the amount of yogurt is not exact, so don't worry about being precise) and stir it into a melted slurry.
  5. Pour contents of the bowl back into the milk pot and stir well.
  6. Pour the pan of warm milk into your containers and put the lids on
  7. Put your containers into your cooler and cover the containers to the fill level with the hottest tap water you can get, then shut the lid! 
  8. Leave it to set for 3-10 hours, yes this is a broad range of time, so the key is in your taste. Like tart yogurt? leave it in there the longest amount of time or over night, the longer it sets the more tart it will be. Take it out after only 3 hours for sweeter mellower flavored yogurt. However if it looks runny still when you check it after 3 hours (like mine did on one batch) leave it in there until it at least looks more gelatinous. 
* if you don't have a cooler,  you can also heat a tea kettle of water up to steamy and boiling and then place the kettle in the center of a large box and place your containers around, but not touching the kettle. Then place towels all around the box and containers to kind of create a sauna in there for it and leave it to set that way.
Like it?
       I hope you enjoy it as much as we do!!!

Please leave comments below with any questions you might have! :)

Sunday, July 1, 2012

Crochet Fun!


   Today I'm adding this blog post simply to encourage everyone to play around with their favorite craft of the moment! My favorite craft changes day to day- the last few days it has been crochet! To be completely honest and upfront, I know very very VERY little about crochet. Mostly, I did with it what I do with everything; learn enough about it to give me the creative spark, and then hijack it and do my own thing!  I don't read instructions well, I'm a hands on gal, and lets face it- crochet instructions have just GOT to be written in another language!
So, this isn't a tutorial, but kind of an un-tutorial. Hopefully it gives you the drive to hijack your own project!

     I saw the fun idea to do interchangeable flowers for crochet hats on Pinterest (of course) but when I clicked on the link it took me to an Etsy site. (of course, lol) I knew some of the bare basics of crochet: slip stitching, chaining, single and double crochet stitches, and I had once paid close enough attention to someone doing a project of their own to get a basic idea of how to do the first round of a granny square (more like granny circle in my case) If you do not know these basics, I suggest YouTube, it is FILLED with great self teaching videos! From there I just started my hijacking with the thought that the round base of the granny square could easily be added onto to create a hat. I won't go into too much detail about how I made the hats, this is an "un-tutorial" after all, mostly I wanted to inspire others to play with stitches, watch some YouTube videos on stitches or projects you don't quite get and play around until you've created something fun. :)
     I figured out how to make the interchangeable flowers in the above pic here: Briar Roses Actually, you could use any of the gazillion crochet flower tutorials on YouTube as your interchangeable flowers, just as long as they have a hole in the center large enough to accommodate whatever button you choose. The thing that got me excited was the prospect of my very girly daughter being able to change out the flower to match each of her outfits. Which is why I chose a warm neutral color for the hat, so that I could make flowers in every color and still have it look great on the hat. I have also started making hats for all the kids since the think they're so cool. it's so fun to change each one up and see what I can do!

Griffin in his "turtle reggae" hat haha!

                                                                                                                                         Like it?

Sunday, June 3, 2012

Baby makes SEVEN!!


Cohen’s Birth Story

       This post is of course, old news, since Cohen is a month old now- but we were a little busy! :)
Photo taken by Brenda Schaefer Photography (unedited)
             After being in prodromal labor for days after our last midwife appointment a week prior, we were greatly anticipating Wednesday May 2nd 2012 for a multitude of reasons. The first was that our midwife had told us that if I was more dilated and effaced she may consider breaking my water to progress labor along and so that AJ wouldn’t miss the birth since he worked so far away (about 45 minutes) and my labors were so quick. At six o’clock AJ and I were praying and fretting over my appointment and nearly having an anxiety attack in the waiting room. I was dreading hearing what Laura (my midwife) might say, thinking she’d say I’d gone backwards and was not going to be having this baby anytime soon like had happened to us with my pregnancy with Griffin. Finally it was our turn to see her and she ushered us in and shut the door so she could check me in privacy. After checking me she said I was dilated to a stretchy 5 (woohoo!) and effaced 95% , however, she also said that she would not break my water because she thought I’d go into labor naturally within the night. I was excited, but devastated at the same time. I am a control freak, and my need to have things in order in my life and absolute answers to things had me chomping at the bit over the complete lack of control in this situation. I wanted her to break my water so that I knew I was ABSOLUTELY going to have a baby in the next 24 hours! Of course though, patient and wise Laura just smiled at me, and was also of course totally right as usual. Within minutes of leaving Laura’s office I was beginning to contract. By the time I got home they were timeable and coming at a pattern of four three and two minutes apart, in that order, repeating again two times in the same order before going to a three, two, two pattern, and then a two, two, two pattern. We called Laura, and she said to call her back after I’d had contractions for an hour. I was not in any pain, and I was walking around and smiling and laughing so no one was taking me very seriously yet. I knew that it was time to get moving though. It was 7:30pm at this point. I called my mom and she was in the middle of watching a TV show and said she’d come over after it was over (still no one thought I meant business, obviously) I called her back in less than ten minutes and told her to come sooner. She laughed at me but came over anyway. When she arrived she was still looking at me like I might be kidding since I was showing no signs of contracting even though they were still a steady two minutes apart. AJ was playing his gory shoot em’ up game on the Xbox and we had called the neighbor girls to come watch the older kids, but they hadn’t arrived yet. I called Laura back again and told her we’d be there by 8:30pm.  While we were waiting for the babysitters to show up mom and I decided to go for a walk. We chatted about the baby’s name, the logging project down below the house, the Christmas trees, and all sorts of things. Mom asked me periodically how I was feeling, though I could tell she was wondering why I’d pulled her away from her show when I was not even pausing conversation for contractions. At around 8:25 when the sitters got there and we’d circled back to the house I announced it was time to go to Laura’s. Both AJ and my mom looking a little surprised said okay and loaded things up, Mom scrambling last minute for her camera that she’d misplaced (that’s kind of important!). We got to the birth center first since mom had to stop and get gas and Laura already had the tub full and the jets going. Still feeling perfectly fine and cheerful but feeling the contractions getting closer together I put my swim suit on and hopped in, relishing the idea of the hot water relaxing my back muscles. It was heaven! Laura had it at the perfect temperature and my whole body instantly relaxed…until I had another anxiety attack! Laura wanted to check me and asked me to tell her when I was having a contraction, and I couldn’t! I couldn’t feel them anymore! My eyes got big and Laura laughed at me explaining that the jetted tub took away 30-50% of the discomfort of labor, and since I wasn’t in pain to begin with, it took it all away! My mom leaned in and said something mocking, something along the lines of "this is going to take all night" , to which I replied in a return mock voice saying ‘What, are you mad at me because I’m not having another quick labor?” We both laughed. My labor with Griffin, my previous pregnancy was only about 30 minutes long in the active stage, so we had gotten spoiled. Laura checked me though and said I was at 8 centimeters with just a little lip left to efface. She also said that my water must have broken because there was no barrier in front of the baby. This is when I chose to tempt fate and asked her mockingly if it was ever going to hurt. Ha! You won’t catch me doing that again! Immediately after I said that the contraction from heck with two L's lit into me and took me by storm. My whole body seized up and I clenched my hands and feet. It took me halfway through the contraction to remember to breathe and try to relax. Sometime before the serious contraction hit my mother in law Lela showed up as well and Laura told everyone that baby would probably arrive within an hour. (Take that mom!) That was at 9:26pm. After my first painful contraction was over Laura asked if I’d like to get out and sit on the toilet for a little bit to see if it would relieve some pressure. I did, and it did relieve some pressure, but within seconds another crazy contraction hit and I was rocking and moaning saying "relax, relax, relax" over and over to myself. AJ was sitting on a stool in front of me and kept trying to offer me his hand to squeeze, which I batted away like an annoying fly...I hate to be touched when I'm in pain. Laura came in and asked politely, but with some authority, for me to return to the tub after the contraction was over, she said she’d delivered babies on the toilet before but it wasn’t her favorite. In my head at the time I was confused, thinking, I’m not having this baby anytime soon, what are you worried about? We listened to her anyway though and when AJ and Laura helped me up we saw that there was vernix off of the baby in the toilet. Wow! Maybe we were going to have him soon! After returning to the wonderful soothing waters my relaxation was brief because the mother of all contractions (ha-ha) hit shortly after. Laura checked me again and told me to push, while at the same time pushing the last little lip of my cervix up over the baby’s head. During that same contraction one push and two breaths later Cohen Jesse Isaac was born!!  He had his umbilical cord wrapped loosely around his belly and I untangled him as Laura helped hand him up to me. What a doll! He had a perfect and flawless little head. No smashed ears, crooked nose, or cone shaped head from a long labor- how could it, the labor was only 15 minutes long if that! He was born at 9:32pm- only six minutes after Laura had said there was probably an hour left. What a whirlwind! After I held and admired him for a while and the umbilical cord stopped pulsing, AJ cut the cord (the first one of our children he ever did that with!) and they took him into the adjoining room to weigh and measure him. I thought for sure he was smaller than Griffin since he had a smaller and more petite head and body figure- but he was four ounces heavier at 8 pounds 12 ounces! Griffin was taller by an inch though as Cohen was only 21 inches. I was shocked at how big he was! I had even carried much smaller this pregnancy than I had with Griffin! Goes to show you can't predict anything when it comes to babies. :)